4.8. High availability
No HA out of the box
Central Management does not support high availability out-of-the-box. This example shows, however, how to set Central Management up for high availability using 3rd party tools.
Cold swap example
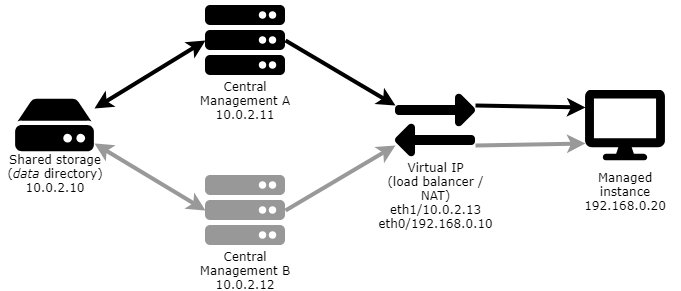
In this example we will use four servers installed with CentOS-7-x86_64-Minimal-1804.iso as OS and a managed instance to demonstrate a cold swap high availability setup. The network setup will be the following:
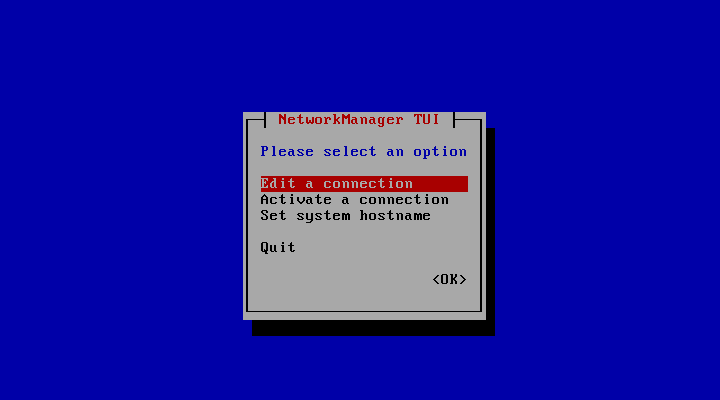
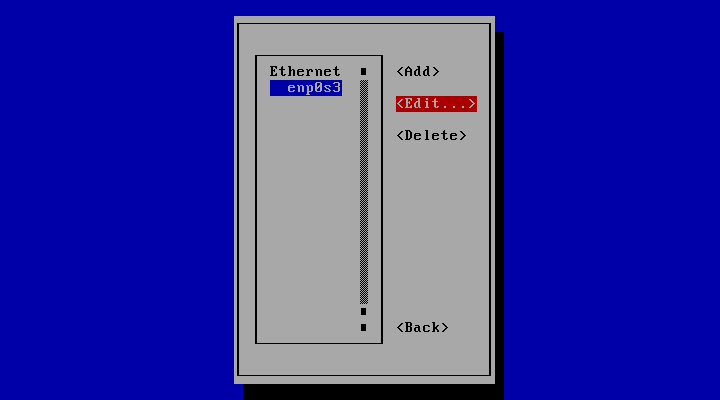
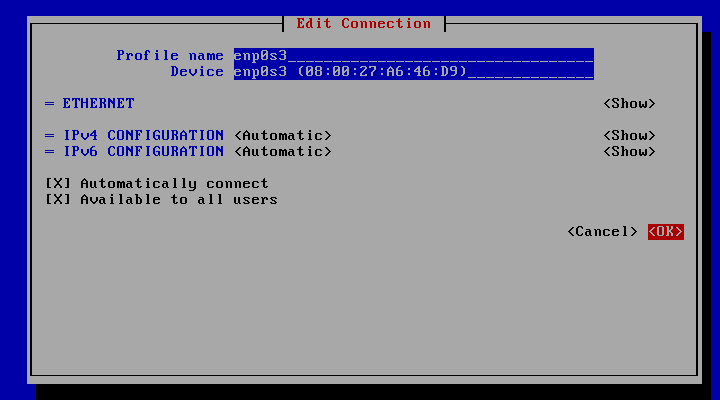
Use nmtui to configure static IP addresses and static routes if needed.
Infrastructure
To build the infrastructure, perform the following steps:
-
Install CentOS on all the four machines (shared storage, Central Management A (active), Central Management B (spare), network address translator)
-
Enable networking on each
-
# nmtui -
-
-
-
Quit nmtui
-
# service network restart
-
Active Central Management node
The active Central Management server will use Network File System (NFS) to access the shared directory where the data files will be stored.
Perform the following steps on the active Central Management server:
-
Install NFS utils
# yum install nfs-utils -
Install Central Management
# yum install mdcentralmgmt-5.2.0-1.x86_64.rpm -
Stop the service
# service mdcentralmgmt stop -
Bind the data directory to the share
-
Back up the contents of the installation data directory
# cp -R /var/lib/mdcentralmgmt /root/backup -
Clear the contents of the installation data directory
# rm -rf /var/lib/mdcentralmgmt/* -
Mount the shared directory on the data directory
# vi /etc/fstab10.0.2.10:/var/nfsshare /var/lib/mdcentralmgmt nfs defaults 0 0# mount -a -
Restore the contents of the data directory
cp -R /root/backup/mdcentralmgmt/* /var/lib/mdcentralmgmt
-
-
Restart the service
# service mdcentralmgmt start -
Record the UID and GID of the centralmgmt user and group (see Sync the UID and GID of the centralmgmt user and group with the active node)
# id -u centralmgmt998#id -g centralmgmt996
Spare Central Management node
The spare Central Management server will use Network File System (NFS) to access the shared directory where the data files will be stored.
Perform the following steps on the active Central Management server:
-
Install NFS utils
# yum install nfs-utils -
Install Central Management
# yum install mdcentralmgmt-5.2.0-1.x86_64.rpm -
Stop the service
# service mdcentralmgmt stop -
Bind the data directory to the share
-
Clear the contents of the installation data directory
# rm -rf /var/lib/mdcentralmgmt/* -
Mount the shared directory on the data directory
# vi /etc/fstab10.0.2.10:/var/nfsshare /var/lib/mdcentralmgmt nfs defaults 0 0# mount -a
-
-
Sync the UID and GID of the centralmgmt user and group with the active node (see Record the UID and GID of the centralmgmt user and group)
-
Record the current UID and GID values
# id -u centralmgmt1001# id -g centralmgmt1002 -
Set the UID and GID values to the same as on the active node
# usermod -u 998 centralmgmt# groupmod -g 996 centralmgmt -
Set the new UID and GID values for all files and directories that must be owned by the centralmgmt user or group
# find / -user 1001 -exec chown -h centralmgmt {} \;# find / -group 1002 -exec chgrp -h centralmgmt {} \;
-
-
Remember to not (re)start the mdcentralmgmt service on the spare Central Management node as it may cause data inconsistency.
Network address translator
The network address translator server will provide the shared IP address for both the active and the spare Central Management nodes. This will ensure that the managed instances will always see the same IP address for the Central Management server either it is the active or the spare server that is doing the actual management.
Perform the following steps on the network address translator server:
-
Enable packet forwarding
# sysctl -w net.ipv4.ip_forward=1-
Persist packet forwarding
# vi /etc/sysctl.confnet.ipv4.ip_forward = 1
-
-
Assign the network interfaces to the firewall zones accordingly
# firewall-cmd --zone=external --add-interface=eth0 --permanent# firewall-cmd --zone=internal --add-interface=eth1 --permanent -
Configure masquerading on the externally facing interface
# firewall-cmd --zone=external --add-masquerade --permanent -
Add the NAT rule
# firewall-cmd --permanent --direct --passthrough ipv4 -t nat -I POSTROUTING -o eth0 -j MASQUERADE -s 10.0.2.0/24 -
Enable instance REST ports (e.g. 8008) so that the managed instances' REST interfaces can be accessible
# firewall-cmd --permanent --zone=internal --add-port=8008/tcp -
Reload and verify the firewall configuration
# firewall-cmd --complete-reload# firewall-cmd --list-all-zones
Switch-over
-
Stop the active Central Management on the active Central Management server
# service mdcentralmgmt stop -
On the spare Central Management server
-
Start the spare Central Management service
# service mdcentralmgmt start -
Activate the license and check if managed instances appear right.
-