4.2. Transport Layer Security
For production MetaDefender Email Gateway Security deployments a more sophisticated TLS configuration is recommended than what is described below. Please consult the nginx documentation on Configuring HTTPS servers for further details.
It is not recommended to use self-signed certificates in production environments. If you do not have a suitable certificate, you can apply to a Certificate Authority to obtain one.
Digital ID
To keep the solution simple, MetaDefender Email Gateway Security uses a single private/public key pair as its digital identifier.
This digital ID –the same certificate– is used when MetaDefender Email Gateway Security acts either as a server or as a client.
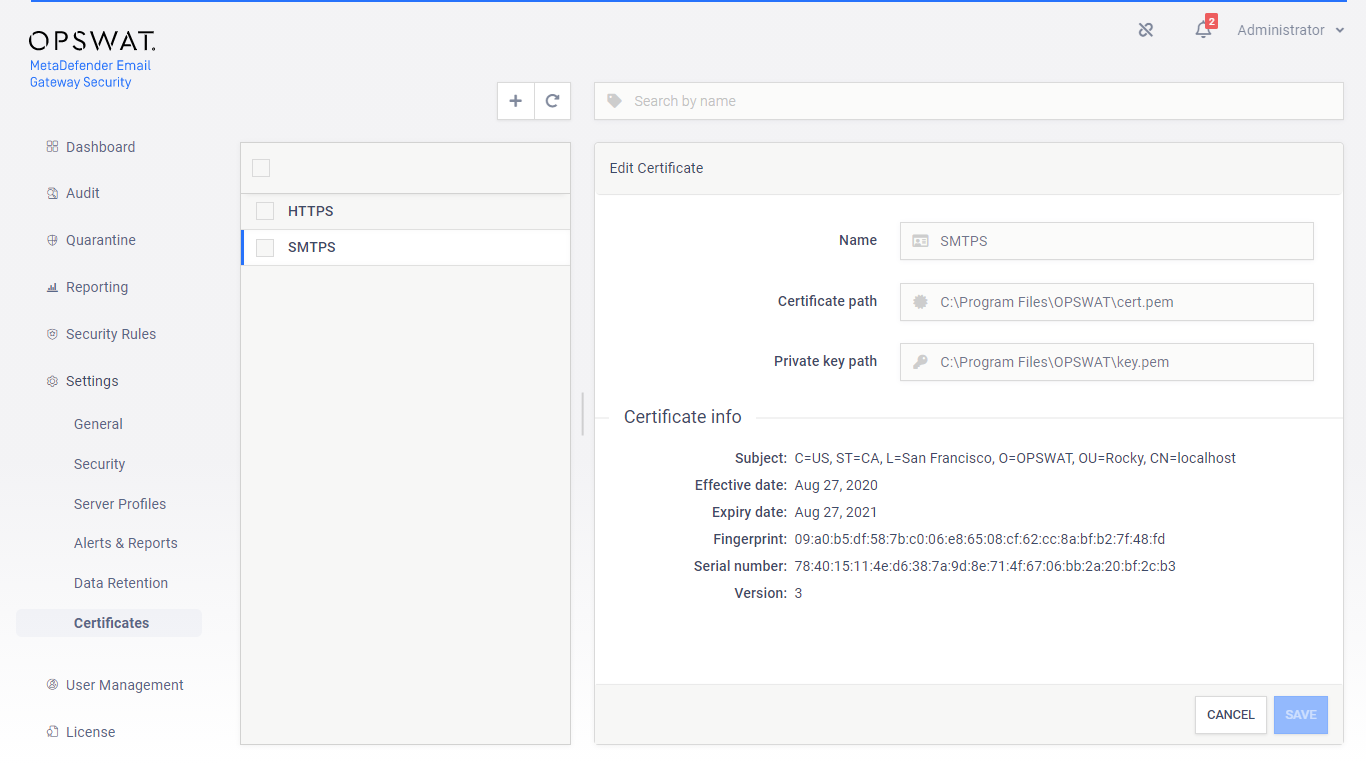
Key and certificate files must be in PEM format.
Key and certificate files
The following files of the digital ID must be placed on the following paths in the server's file system:
|
|
Path |
|
Private key |
<install base>\data\key.pem Example: C:\Program Files\OPSWAT\Metadefender Email Security\data\key.pem |
|
Certificate |
<install base>\data\cert.pem Example: C:\Program Files\OPSWAT\Metadefender Email Security\data\cert.pem |
|
Private key and certificate |
<install base>\data\tls.pem Example: C:\Program Files\OPSWAT\Metadefender Email Security\data\tls.pem |
Inbound connections
Web Management Console and Public Rescan Page
OpenSSL required
To enable TLS for the web management console, OpenSSL must be installed on the server.
For details see 3.1. Prerequisites.
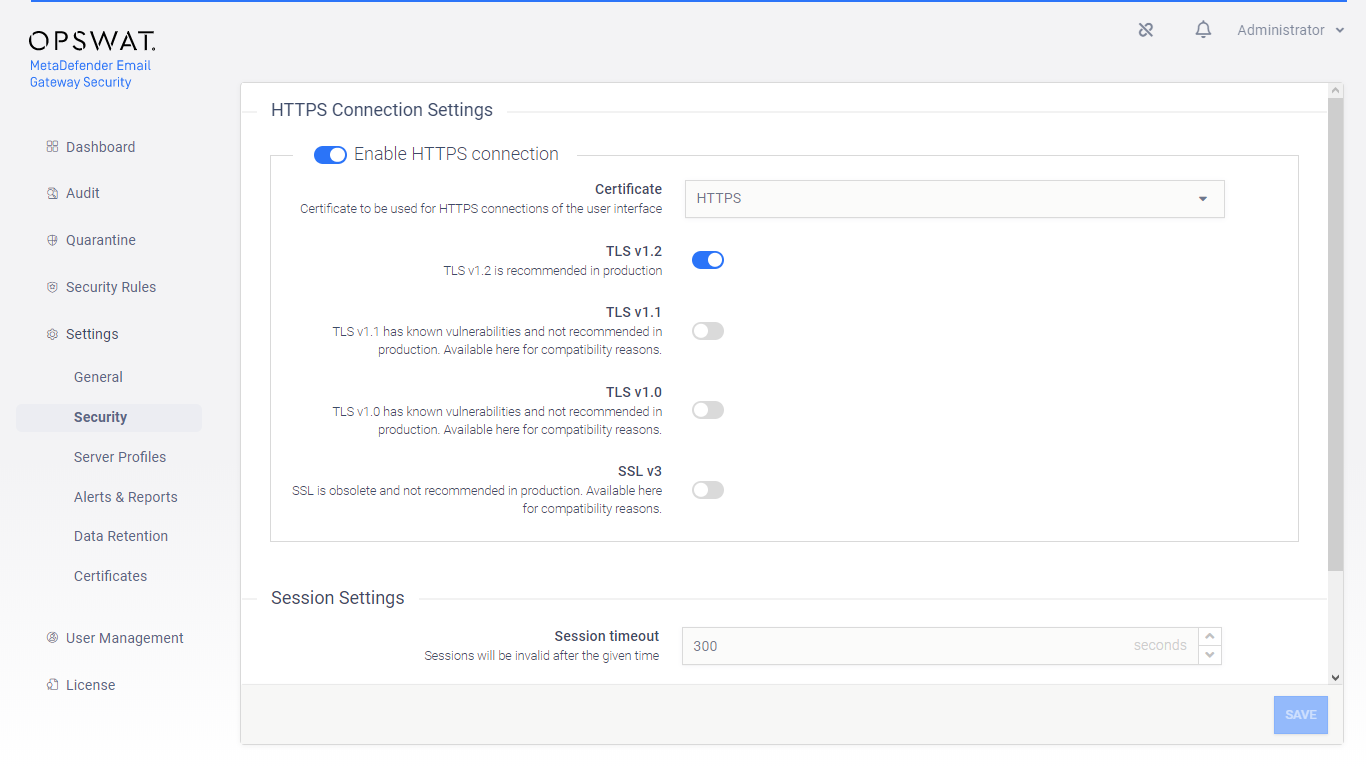
MetaDefender Email Gateway Security supports accessing the Web Management Console and the Public Rescan functionality (for details see 5.6. Password protected attachments) via HTTPS. This feature is, however, not enabled by default. To enable HTTPS you should perform the following steps.
Public server address
The TLS settings of the web management console are propagated to the Public server address under Settings > General / Configuration.
For example, when TLS is enabled for the web management console, then the scheme for the Public server address will be changed to https. When TLS is disabled for the web management console, then the scheme for the Public server address will be downgraded to http.
For details see 4.3. Settings.
-
Define a certificate and private key pair under Settings > Certificates for the HTTPS connections.


-
Using the certificate defined in the previous step, enable HTTPS under Settings > Security.
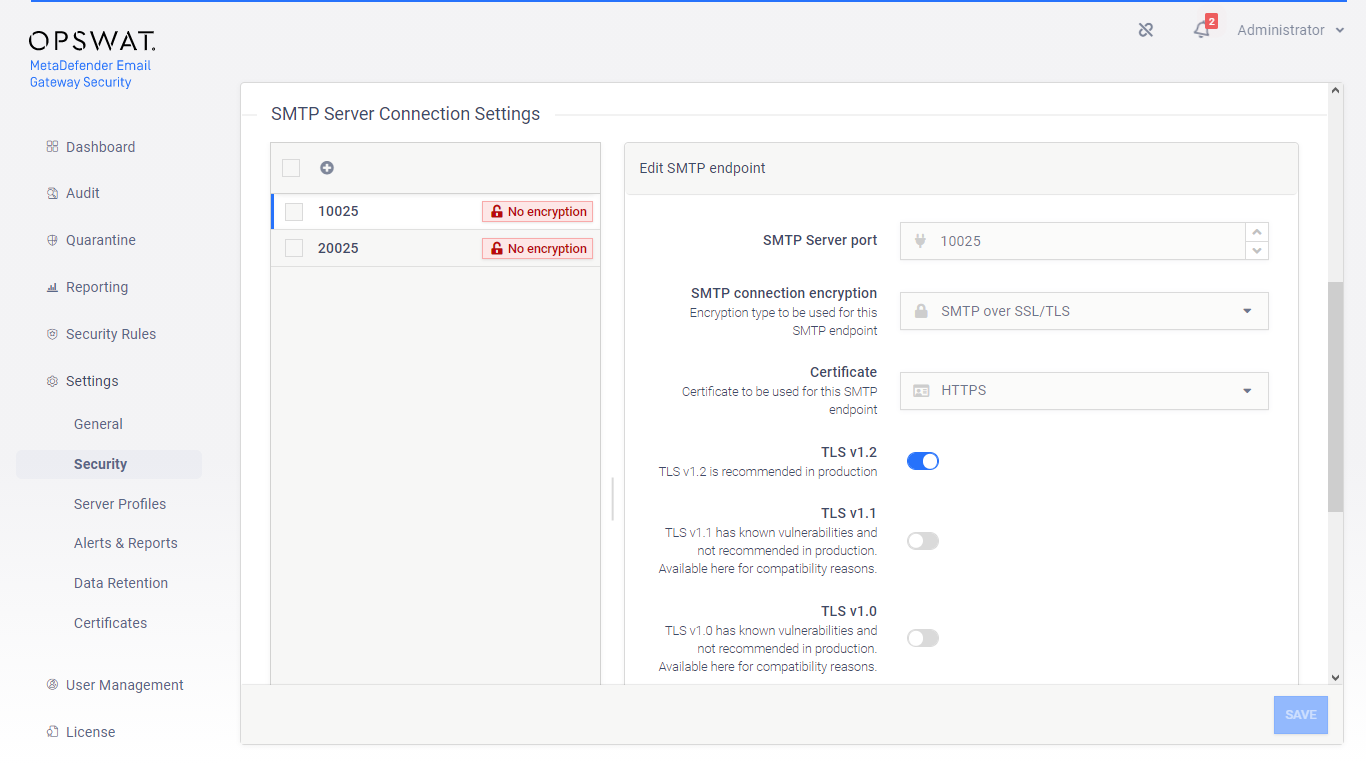
Inbound SMTP services
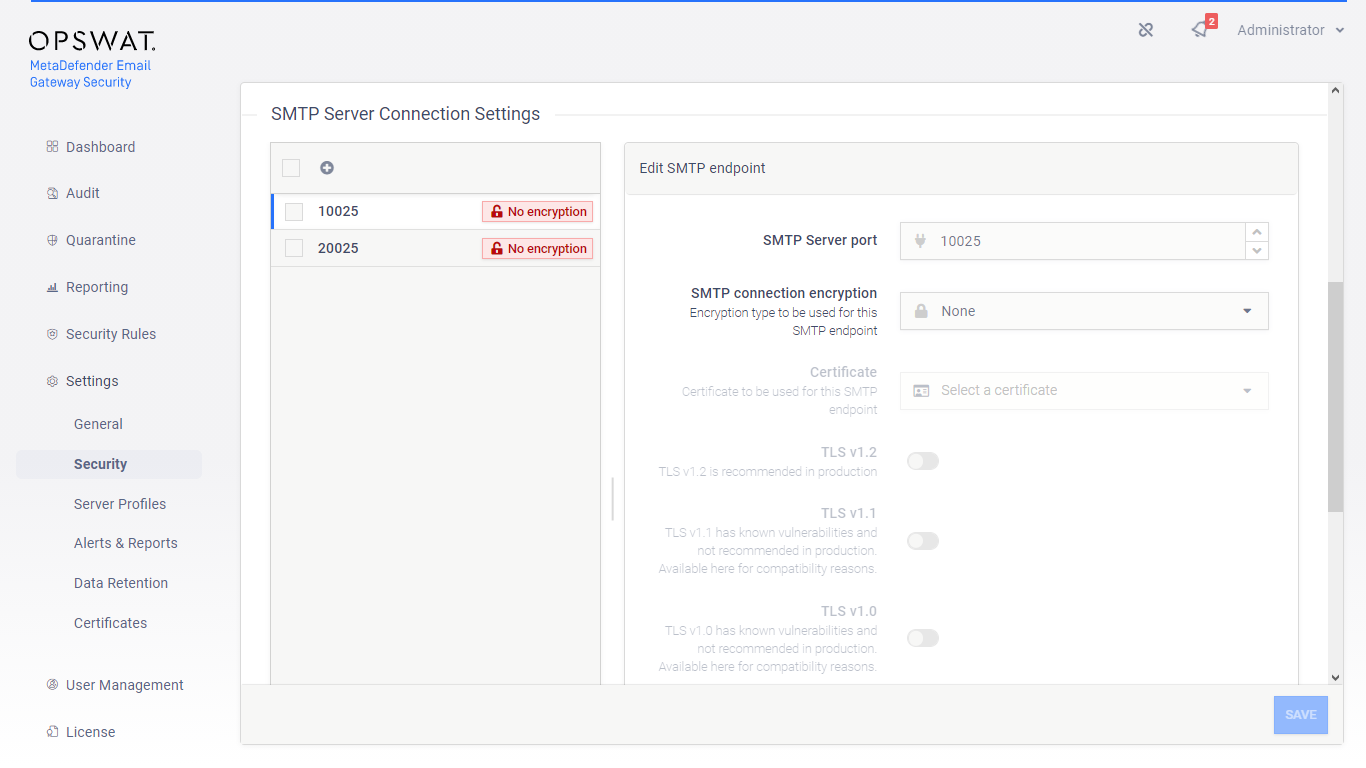
Email Gateway Security can listen on multiple SMTP ports providing the option to apply different TLS settings for each SMTP port.
To enable TLS for a certain inbound SMTP service:
-
Define a certificate and private key pair under Settings > Certificates for the HTTPS connections.
-
Under Settings > Security / SMTP Server Connection Settings select the SMTP service for which the TLS needs to be set
-
In the Edit SMTP endpoint panel apply the desired settings for the SMTP service:
-
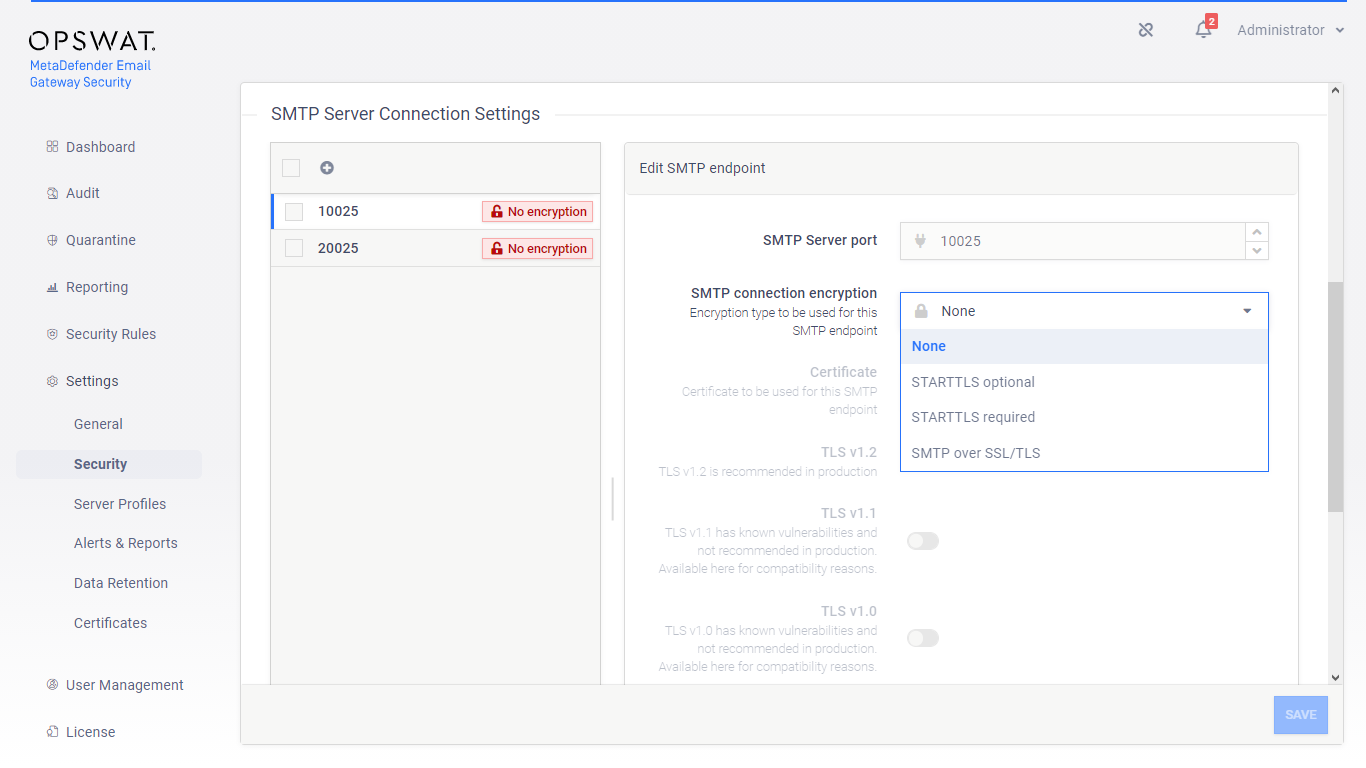
Select the appropriate SMTP encryption method
-
Use the certificate defined in step 1 and select the desired TLS versions
Specific port only
These TLS settings apply to this specific port only.
-
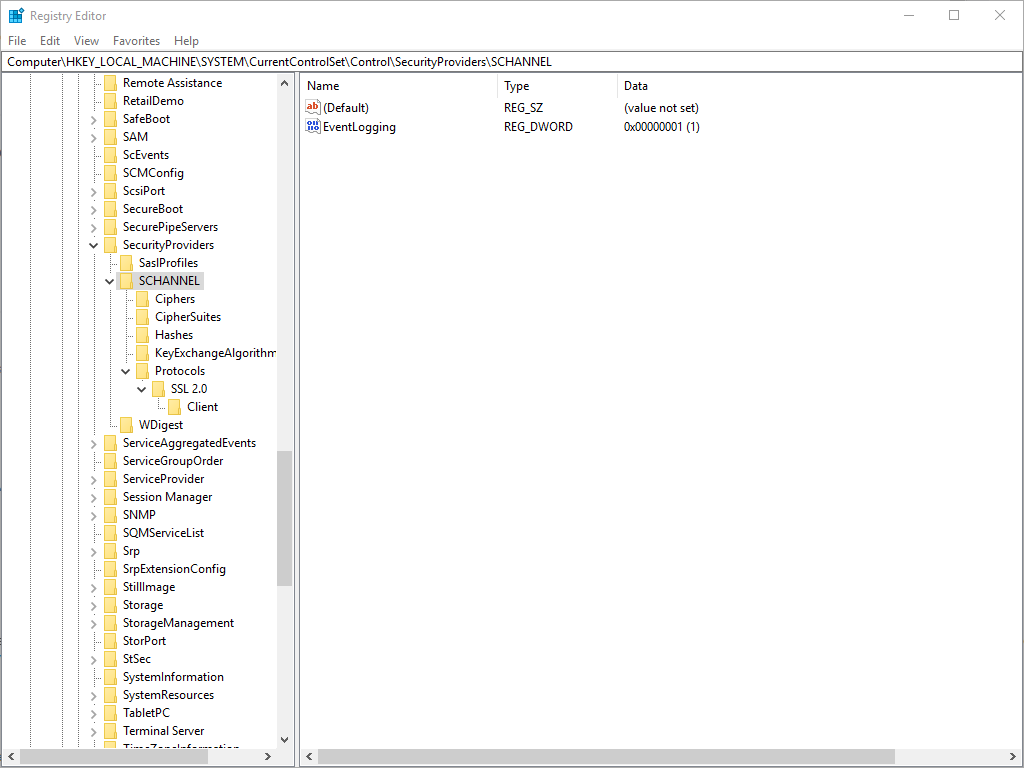
TLS cipher suite settings for inbound SMTP
Email Gateway Security uses Window's Schannel for inbound SMTP secure connections by default. This makes possible to configure the accepted ciphers, cipher suites via Windows registry. You can find information about how to configure specific settings here: https://docs.microsoft.com/en-us/windows-server/security/tls/tls-registry-settings.
MetaDefender Core type server profile webhooks
Email Gateway Security supports webhooks to get the scan results from MetaDefender Core. Basically for webhook notifications Email Gateway Security listens on a server port where it receives the notifications from Core. This server port can be configured for TLS.
For details about webhooks see 4.6. Server profiles.
To configure TLS for the webhook service, perform the following steps:
Prerequisites
-
Both Email Gateway Security and Core must be configured for TLS/HTTPS on their web management console interfaces.
-
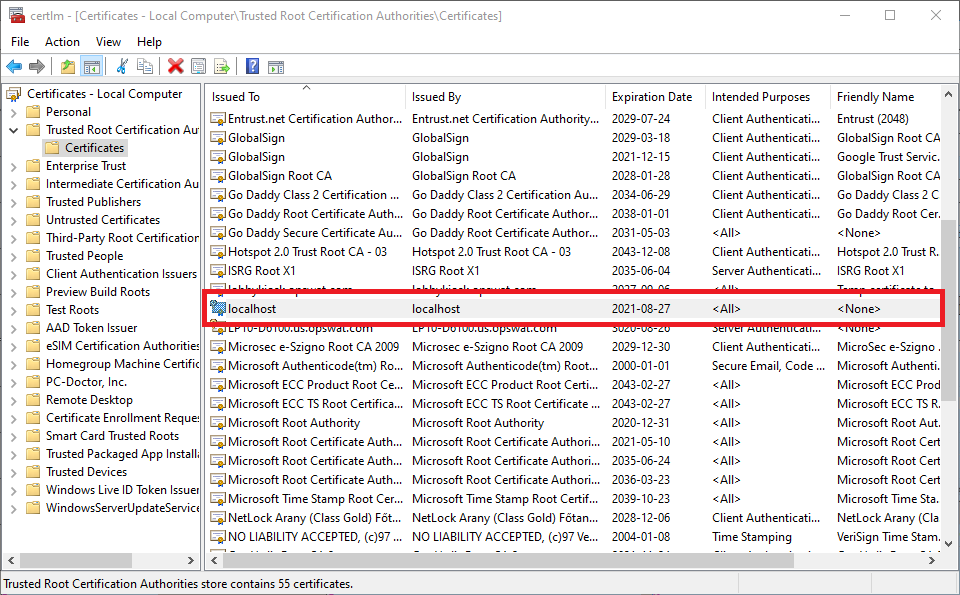
The server certificate must reside in the Windows certificate store
-
In the Trusted Root Certification Authorities store and
-
In PKCS12 / PFX format (containing both the certificate and the private key; notice the little key in the icon of the certificate)

-
-
Set the public server address to the domain name of Email Gateway Security, to what the certificate is issued to

-
Enable Settings > Server Profiles / MetaDefender Core type profile / Enable Webhook callbacks and configure for a dedicated port

-
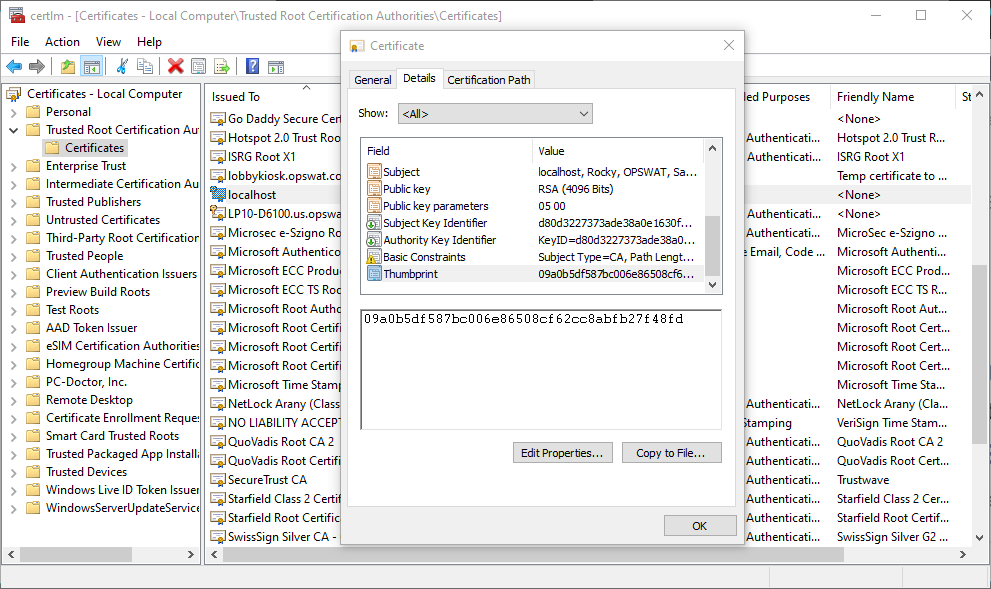
Get the thumbprint of the certificate (for safety copy from certlm and paste for example into Notepad first, then copy from Notepad and paste to cmd from there in the next step)
-
Use netsh command to bind the certificate to the webhook port
cmdnetsh http add sslcert ipport=<ip>:<webhook port> certhash=<thumbprint> appid=<guid> certstorename=rootExample (IP address 0.0.0.0 means all interfaces of the server)netsh http add sslcert ipport=0.0.0.0:8089 certhash=09a0b5df587bc006e86508cf62cc8abfb27f48fd appid={00112233-4455-6677-8899-AABBCCDDEEFF} certstorename=root -
When Email Gateway Security is not running as Local Service, enable access to this port for the appropriate user
cmdnetsh http add urlacl url=<scheme>://+:<port>/ user=<user>Examplenetsh http add urlacl url=https://+:8089/ user=everyone
Outbound connections
TLS for outbound connections can be set up at the appropriate server profile. For details see 4.6. Server profiles.
In case of outbound connections the servers certificate must always be trusted by the client.
In practice it means that either the CA certificate –that was used for signing the server's certificate–, or the server's certificate itself must be installed in the Email Gateway Security's operating system's trusted certificate store.
Default (bundled) MetaDefender Core
To configure TLS between Email Gateway Security and the bundled MetaDefender Core simply enable TLS for Email Gateway Security as it is described in the section Web Management Console and Public Rescan Page above.
TLS propagation
TLS settings –such as the certificate and the TLS version– are automatically propagated to the bundled MetaDefender Core.
Localhost as certificate subject
Email Gateway Security connects to the bundled MetaDefender Core using the pseudo host name localhost. As a consequence, when TLS is to be set up between Email Gateway Security and the bundled Core, the certificate must support localhost as the subject.
Practically this can be achieved providing localhost as a subject alternative name.
General MetaDefender Core
To connect to a Core server over TLS perform the following steps:
-
Configure the Core server to listen on HTTPS. For details see 3.8.1 Enabling HTTPS,
-
Add this Core to your server profiles using https scheme. For details see 4.6. Server profiles.
Outbound SMTP
To connect to an SMTP server over TLS first you need to decide which favour to use: StartTLS (TLS over SMTP) or SMTPS (SMTP over TLS).
Due to security considerations always prefer SMTPS to StartTLS whenever possible.
StartTLS
In case of StartTLS you still need to decide whether using StartTLS is just an option or it is mandatory.
Optional StartTLS
If StartTLS is optional then the client will try to establish the TLS connection, and if it fails, then the connection will fail over to a clear text connection.
To connect to an SMTP server using optional StartTLS perform the following steps:
-
Configure the SMTP server to either
-
Support StartTLS – in this case clear text SMTP connections will be upgraded to TLS; or
-
Not support StartTLS – in this case SMTP connections will be fall back to clear text.
-
-
Add this SMTP server to your server profiles
-
Using smtp scheme, with
-
TRANSPORT LEVEL ENCRYPTION set to STARTTLS optional.
-
For details see 4.6. Server profiles.
-
Mandatory StartTLS
If StartTLS is mandatory then the client will try to establish the TLS connection, and if it fails, then the connection will fail.
To connect to an SMTP server using mandatory StartTLS perform the following steps:
-
Configure the SMTP server to Support StartTLS;
-
Add this SMTP server to your server profiles
-
Using smtp scheme, with
-
TRANSPORT LEVEL ENCRYPTION set to STARTTLS required.
-
For details see 4.6. Server profiles.
-
SMTPS
In case of SMTPS, the TLS handshake comes first, and if (and only if) it succeeds, then the SMTP connection is established over the TLS.
To connect to an SMTP server over TLS perform the following steps:
-
Configure the SMTP server to listen on SMTPS.
-
Add this SMTP server to your server profiles using smtps scheme. For details see 4.6. Server profiles.