How to scan mapped drives with MetaDefender Client?
MetaDefender Client can scan files in mapped network drives if the drive is mapped under administrator privilege on any system that can reach your MetaDefender Client server. If you would like to initiate scans through the command line using the MetaDefender Client server itself, see below.
Note: The mapped drive will be marked as a “Disconnected Network Drive” in Windows Explorer. This is only a display issue, the mapped drive can be used in the same way as a typical mapped drive is used.
In order to scan mapped drives with MetaDefender Client, the mapped drive must be created under the SYSTEM account:
-
Download PsExec64.exe or PsExec64.exe, depending on your OS bitness (32 or 64), from the "Sysinternals Security Utilities" suite at https://docs.microsoft.com/en-us/sysinternals/downloads/security-utilities
-
Place the PsExec64.exe tool on the machine where the mapped drive is to be created E.g. C:\Sysinternals\PsExec64.exe
-
Open a command prompt with elevated privileges.
-
Navigate to the directory where PsExec64.exe was copied. E.g. “cd C:\Sysinternals”
-
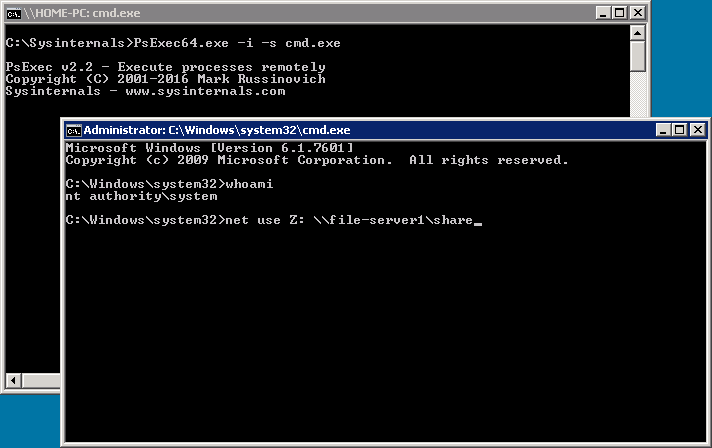
Execute the following command to open a command prompt as the SYSTEM user: "psexec.exe –i –s cmd.exe”
-
In the new command prompt window that just opened, execute the following command: “whoami”
-
Confirm that the current command prompt is running as “nt authority\system”.
-
Execute the following command to mount the mapped drive: "net use <desired drive letter> <UNC path to map to>" E.g. “net use Z: \\file-server-1\share”
MetaDefender Client should now successfully scan the mapped drive and the mapped drive should be accessible to all users on the computer.
This article applies to MetaDefender Client
This article was last updated on 2019-10-25.
VM